Fildisi comes with the Visual Composer, a visual layout builder that allows you to forget about syntax of shortcodes and create multiple layouts within minutes without writing a single line of code! You can edit, delete, increase and decrease size of each item.
Furthermore, you can reorder the elements,copy-paste and save templates. It has very simple and instinctive interface! Don’t forget to read the Rows/Columns section in this documentation, where you will discover the amazing responsive possibilities.
As you can easily see, Fildisi’s elements are especially handmade for the theme’s preferences and they harmoniously use the amazing visual interface of the composer. That means you will not find just one Visual Composer copy in Fildisi!
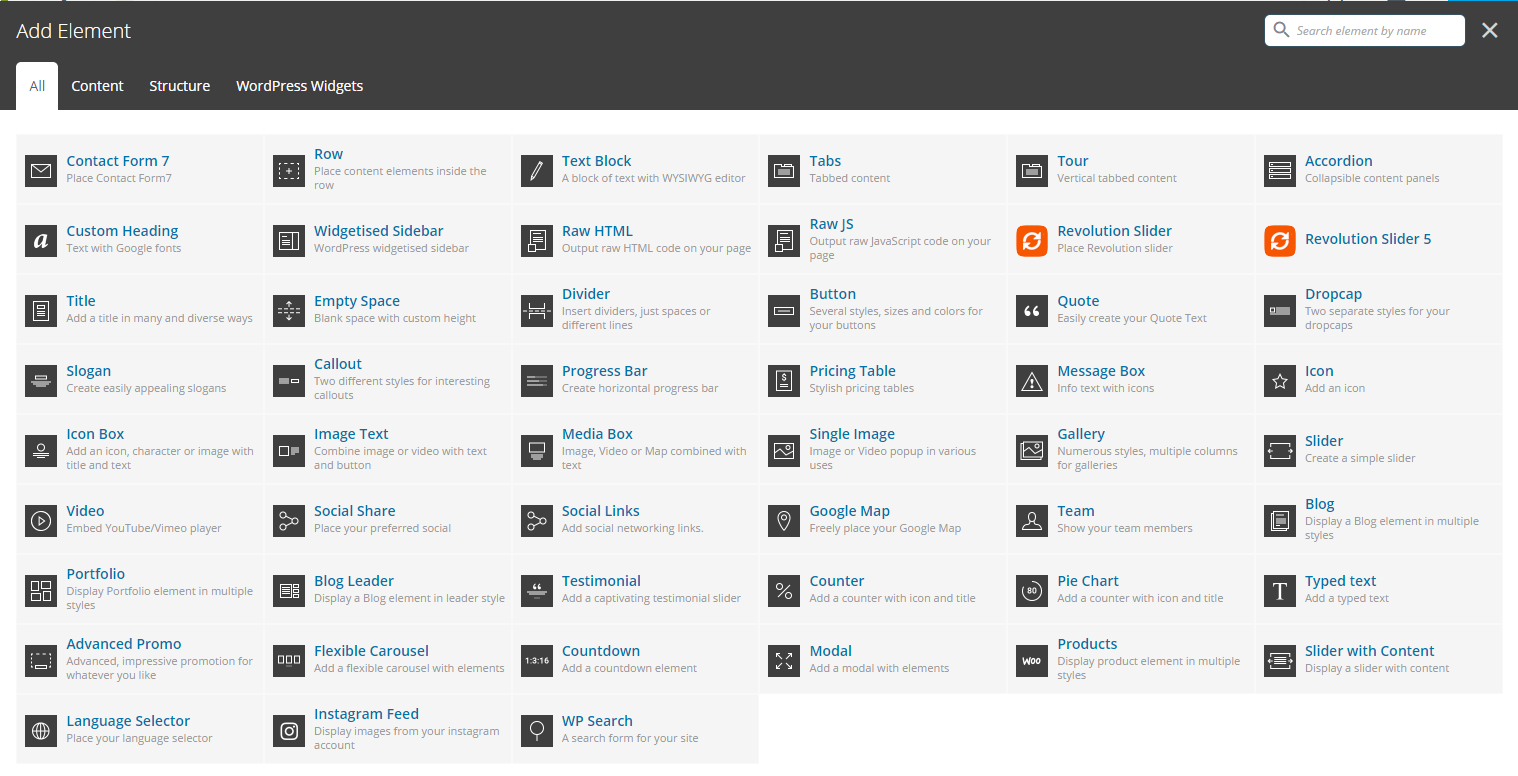
Let’s take a brief look at the elements:
Contact Form
With this element you can simply use any Contact Form 7 you’ve created. When using the Contact Form, the default layout is to have one field per row.
However, you can have multiple fields in the same row with different styles by adding some HTML markup. For more details visit this related article on our Knowledge Base.
Row
Design your row and then place any content element you wish inside.
Text Block
Add the text you like by using the classic TinyMCE. Additionally, style your text as Leader text or Subheading text to create more interesting text areas.
Tabs
Simply add horizontal tabs as needed until you are ready.
Tour
Simply add vertical tabs as needed until you are ready.
Accordion
This element creates an accordion panel that expands when the user clicks on the title to reveal more information.
Custom Heading
This is what you read. You are able to select any Google font you like, set the size, the tag, align, color, line height and set the link URL.
Widgetised Sidebar
Select the widget area you want to dispay. Moreover, you can style particular element differently by adding a class name and refer to it in custom CSS.
Raw HTML
With this element, you can output raw HTML code on your page.
Raw JS
By this element, you can output raw JavaScript code on your page.
Revolution Slider
You can place the Revolution Slider and select which one you want to display.
Title
This element will create a title that you can use to introduce a new section in a page or even an element. You can set the alignment, the header you prefer and the line-style(if you use a line).
Empty Space
Add a Blank space with the height you prefer.
Divider
With this element you can create a divider (line, double line, dashed line or back to top) to better separate your elements and sections. Additionally, you can split you pages by using full-width dividers.
Button
The button element is an easy way to add a styled button to your page. Just choose the appropriate type(simple,line), size, shape and color and icons from 5 different Font libraries. Finally, fill out the other fields (text, link) and off you go!
Quote
Add your text, set the animation you like and your quote text is ready to be published.
Dropcap
Two styles for dropcaps. Add your text, choose your style, set the animation and save.
Slogan
The slogan element creates a slogan with two buttons. Simply add title, subtitle, text, line-style and buttons (1 or 2).
Call-Out
With call-out element you’re able to choose your preferred style, give a title, your text, button and off you go.
Progress Bar
This element creates horizontal bars that get animated in accord with the percent given; the best way to show your skills in a visual way with multiple styles.
Pricing tables
Pricing tables is used to display any subscription options in an appropriate column. Create the tables you wish (don’t overdone with this, 4 tables per row are enough) and add your data.
Message Box
With this element you create a message text with an icon and background color.
Icon
Just like the Icon Box but with only a single icon and multiple options. Use any font from 5 different Font libraries, select the icon size, shape, colors, align, set the link.
Icon Box
Another element with multiple options. Firstly, select the icon size and the icon shape. Secondly, you can use any font from 5 different Font libraries, upload a png icon or even write a character(letter or number)! Give title, text, link, align, box color, advanced hover (if you like) and enjoy it!
Image Text
With this shortcode you can simply upload an image(with a video popup if you like), title,text and button(any type).
Double Image Text
With this element, you can combine images and video with text and buttons.
Media Box
Media for Fildisi means image, video or map. Combine one of these with title, text, link and you’re ready!
Single Image
Upload a single image and give the align, animation, link you wish. You can have Image, Image Link, Image popup and popup video.
Gallery
The Gallery element has 2 different styles for showing your image galleries with various options. Classic Grid and Masonry with multiple options for hovers, overlays, columns and more. You can easily create full width galleries. Keep in mind that in Grid and Carousel style you are able to select the image crop.
Slider
This element is not just a simple slider. Upload your images, select the navigation type and color. Set if you want autoplay, the slideshow speed, the image crop/resize! Don’t forget to set it to full width element, it’s great!
Video
You can just add a video(YouTube, Vimeo), even full width video.
Social Share
With this element you can simply add social media icons anywhere in your pages in multiple styles.
Social Links
You can add social networking links and style them by selecting their size, color, shape and alignment.
Google Map
Give the Latitude/Longitude, set the zoom you wish for your map. Upload the marker you like, set the map height.
Team Member
This element takes in a quick profile for a team member/employee and formats it attractively. Add the information you wish, it’s so simple.
Blog Element
The Blog element is undoubtedly one of the most important elements which most of the users will probably use. Based on that fact, Fildisi really offers multiple options for this element. Let’s see them briefly, starting with the basic styles.
- Large Media
- Small Media
- Masonry
- Grid
- Carousel
For more details on how to use the Blog Element please visit this related article on our Knowledge Base.
Portfolio Element
Another famous element for any site is the Portfolio element in order to showcase your work online. Based on that fact, Fildisi really offers multiple options for this element. Let’s see them briefly, starting with the basic styles.
- Grid
- Masonry
- Carousel
For more details on how to use the Portfolio Element please visit this related article on our Knowledge Base.
Blog Leader
This element was specifically created for the needs of any Blog theme. Select between the Classic and the Fildisi style, define the number of the posts, categories and many more.
Testimonial
This element creates a nicely slider out of your testimonials items. Go Testimonial > Testimonial Items and create your testimonials. Afterwards, add the testimonial element and define the various settings like categories, speed, navigation and more.
Counter Element
This element can be used to quickly create animations that display numerical data in a more interesting way. You can set colors, icon, title, text and more.
Pie Chart
With this element you can create appealing pie charts with multiple options.
Typed Text
Add your prefix text, your suffix text and add-style the Typed Text which makes your text moves.
Advanced Promo
This is a special element. You can easily create a nicely colored tabbed sections (rows) with image (logo), text and button. Just create multiple Promo Advanced elements in different rows, define the colors(backgrounds) you prefer and collapse these rows. This creates very appealing and interesting areas to show off your partners or anything else you wish. We recommend to use the Promo Advanced element on pages without sidebars.
Flexible Carousel
With this element you can create very appealing and interesting carousels to show off multiple elements. Add the Flexible Carousel in a row and click to start adding elements into it in order to have various content in the carousel. Create columns, define the responsiveness, select your navigation type and many more. Impressive?
It is worth noting that this is a complicated element so we suggest to use only the elements that you first see when you click the Add button.
Countdown
Place the countdown element and style it by selecting its style, size, text size, number color, text color, bottom margin and many more.
Modal
With this element, you can create custom modals with the usage of any elements you wish.
Products
You can display product element in multiple styles. Choose its style between Grid and Carousel and set its color, typography, image effect and many more.
Slider with Content
With this element, you can display a slider with content by selecting the post type (product, post, portfolio), title tag, title size, parallax etc. You can also set the slideshow speed and select the navigation type and color.
Portfolio Parallax
This element was specifically created with the amazing Fildisi style on mind. It is recommended to be used in one column layout and to have custom excerpt in the portfolio items you will show for better visualization. Define the number of the portfolios, categories, typography etc.
Language Selector
Place the language selector and select its alignment and CSS animation.
Instagram Feed
Add the Instagram username, the image size, the number of the columns, the gutter among them and you are ready to get the Instagram Feed in your site.
WP Search
The classic WP search widget in order to add it anywhere you wish in your content.
In the majority of the elements you can define CSS animations with time delay and duration.
You can also enable the CSS animations on mobiles with the code below under Appearance > Theme Options > CSS/JS Code – JS Code
deviceAnimAppear = true;